The Healthy, Happy Ebook

Search This Blog


Welcome!!!

Thanks for stopping by! I'm young, I'm in love with my man, and I'm a mommy. We're busy, but happy. I'll share with you how to eat natural, healthy, whole foods while balancing family life! Learn to love your food, it will love you back!
Powered by Blogger.
Showing posts with label berries. Show all posts

Tuesday, June 18, 2013

Welcome Back Green Smoothie


Hello All


I hope you forgive me for my looooong absence. We welcomed our third baby just a few weeks ago. I had a tough pregnancy so I decided I needed to cut something back so I could function and take care of my other two little people so I took a break from the blog!

But- our third little is here! He is an angel and I am excited to be back to inventing some fun healthy food. 

I have had some thoughts as I've been continuing to do research on what I believe is the healthiest way to eat. I have thought about this a lot in these last few weeks especially as I've been concocting my plan of attack on how to drop the baby poundage. 

I continue to believe that an 80%-90% plant based diet is the healthiest. These are nature's foods for our bodies. They are chuck full of so many nutrients and low calories so we can eat our fill without counting calories (which is totally exhausting in my opinion!) I, however, believe that having small amounts of animal products is not going to kill us. I feel fine giving my little people eggs, yogurt, and lean meats. We continue to cut out red meat it tastes disgusting to me at this point unless it's a good old home cooked hamburger at a fourth of July barbecue...am I right people, there isn't much better :). 
We don't eat a lot of pork either. We stick to lean poultry. 

However I feel most protein should come from plant products and grains for example:

Black Beans
Quinoa
Broccoli
Nuts and Legumes

So many people worry about the fat content in nuts, just remember that you are putting healthy fats into your body. Instead of worrying about fat count...worry about types of fat! Now do I suggest grabbing a spoon and eating half a jar of peanut butter, no. However a handful of almonds or a spoon of peanut butter is a great way to get some protein and healthy fats into your system. 

So my plan of attack for weight loss (I invite anyone to join in this plan with me and we can all give each other suggestions and help each other...support is key)

I begin my day with a huge Green Smoothie! (I am nursing so I do need more calories so I also might add some peanut butter or oatmeal with my smoothie)

For lunch I stick to plants, a large salad with beans and nuts on top and low fat/low cal dressing

Then for dinner I have been preparing the lean meats with fruits and veggies for the whole family to eat. 

So far I've been losing healthy weight loss and I'm on my third week post baby, I've been dropping about 2-2.5 pounds a week (well not counting the huge amount of water weight) and I have to report I truly feel that this style of eating is helping me function when I am seriously sleep deprived and have two wild munchkins to entertain all day on top of baby! 

So anyways I wanted to post a yummy green smoothie recipe that is chuck full of goodness, but low fat! This green smoothie by the way is not green...it doesn't have to be green to be considered a green smoothie, most of mine turn a disgusting brown color!

Energy Lovin' Green Smoothie

3 HUGE handfuls of spinach, kale or collard greens (or all of them)
1 cup frozen berries
1 1/2 Banana
1/2 apple, chopped
Water 

Add spinach to blender. Add water to help blend spinach. Blend until pureed, about 90 seconds. Add banana, then berries, then chopped apple. Blend until completely incorporated and smooth. About another 90 seconds. Serve chilled! This has incredible amounts of fiber and nutrients to help you get through your morning! I pour mine in a bottle and carry it with  me, for my nearly hands off breakfast! Good with kids!

Enjoy

What are your favorite healthy breakfast recipes? What is your plan of attack for getting your ideal body weight?

Thursday, August 23, 2012

Healthy Waffle Trifle


Breakfast for dinner is a favorite meal from time to time! Why not shake up the dinner table with breakfast! This meal doesn't consist of sausage, hash browns, bacon or eggs! This is filling, fruity, sweet, gluten free, and full of fiber and protein! And you want to the know the absolute best part? Kids devour this! No problem. My kids couldn't get enough. Ever since I discovered the recipe for the whole grain blender waffles I've been wanting to try this, I found this remake of the waffles from wholefoodmommies, they never let me down! I was so pleased, I only made a few tweaks to the whipped topping.

I had originally planned to make waffle fruit pizzas, which I still plan to do, but unfortunately the first few waffles I ruined somehow. Really how is that possible it's not that hard to watch them on the waffle iron. Anyways, I ended up following the original trifle idea and it was wonderful. We are using these for "Y" day, yes I skipped "X" I mean really, that's a hard one. We're calling these "Yummy" Waffles! Okay, it works. I have a great "Z" meal planned....and yes it really does start with "Z"!

 I do think the pizzas would be fun though! After I put this together I thought "This is so pretty!" This is a perfect brunch or shower dish! No one even needs to know it's GOOD for them! Go ahead, be the talk of your next get together with this beauty!


Healthy Waffle Trifle
Waffles
 2 C water
1 T honey
1 C oats
1/4 C millet or corn meal
1/4 C ground flax seed
1/4 C raw almonds or cashews
1 T cornstarch
1/4 tsp salt
 
Combine all ingredients to the blender and blend on high until it is well combined. Pour generous amount to waffle iron. The waffles should be a dark brown, then they are done. 
 
Whipped Topping
 12 oz silken tofu
1 tsp cinnamon
1/3 C maple syrup
1/2 C non-dairy milk
1 tsp vanilla
 
Combine everything to the blender and blend until it is well mixed. 
 
Tear small pieces of waffle and spread onto the bottom of a trifle dish or bowl. Add desired fruit in a layer. I used mango, strawberries, and grapes. But any type of fruit would be awesome. Top fruit layer with whipped topping and repeat for two or three layers! Serve chilled. Enjoy

* If you'd like a vegan option take out the honey from the waffles and use 2-3 dates or agave


Tuesday, August 14, 2012

Vegan Strawberry Cobbler


Okay here is my promised, not forgotten "U" day! Alphabet days is coming to close. I switched up "V" day and today because I was so anxious to share the Rumbi Salad. This is also a stretch for the letter "U", I'm going to pretend to call it strawberry upside down cake, but really it's a cobbler...it's no big deal!

Have you ever sat in your quiet house, if you have kids, after the kids go to sleep and just had a craving for something sinfully delicious to enjoy while escaping into your favorite TV show? Introducing this cobbler! That is exactly what I experienced last night! I needed something sweet, but healthy so I could sit and soak up the drama of Army Wives....okay yes I love Lifetime shows, it's not a problem!!!! This was such a fast prep work I couldn't believe it, and the end result fit my need. This will not be as sweet as traditional cobblers, however the upside is you can eat two servings without so much guilt! I'm all for that. This would be delicious with some vegan ice cream snuggled right next to it, melting all over the place with the warm cobbler!

I'm going to try this cobbler in our dutch oven soon and see how the end result turns out. You can use any fruit you'd like. I was going to use peaches, but Derek requested that I didn't, he just isn't a peach fan that crazy guy! So I pulled out the strawberries. It was wonderful too. Please excuse the pictures, it was dark outside and my house lighting is just the pits, it looked amazing and tastes even better!


Vegan Strawberry Cobbler

Crust

3/4 C whole wheat flour
1/4 C coconut sugar (optional)
1/4 C agave
1/4 tsp baking powder
1/4 tsp baking soda
1/4 tsp salt
1/2 tsp cinnamon
5/8 C almond milk
1 tsp vanilla

Filling
4 C chopped strawberries frozen or fresh
1/8 C  coconut sugar
1 T chia seeds

Preheat oven to 400 degrees. Place all the filling ingredients in a 9x9 baking dish and place them in the oven to heat while you mix the crust ingredients.


 Pull baking dish out of the oven and pour crust mixture over the top.


 You can sprinkle top with raw cane sugar if you'd like but that is optional. Bake for 30 minutes until crust is baked all the way through! Serve warm! Enjoy


Tuesday, August 7, 2012

Raspberry Chocolate Freezer Bites


This summer has been perfectly mild most days. It has had a few scorchers, but I have felt that it has been sunny, comfortable perfect frozen treat weather.

As I said in my earlier post I had planned on making something involving raspberry and chocolate...okay the excuse was because we are learning the letter R but mostly it's because I am a fool for raspberry flavor...okay okay and chocolate!

In my mind the simple recipe was going to work out perfectly. It was going to form round little pieces of chocolate that would be sinfully delicious and put DOVE chocolate to shame :)

....this little dream land didn't work out so perfectly. My original thought didn't set up for some reason...it was crazy. It was just a nice tasting liquid blob for over two hours. So I had to really think and brainstorm on how I could get this creation to set up nicely. After some extra ingredients added in, I finally was able to get it to solidify, but if you leave them out too long they do start to thaw very quickly! They turned out really yummy and they will be a fun freezer snack whenever the urge hits for a sweet!

Raspberry Chocolate Freezer Bites

1 C fresh raspberries
3/4 C dark chocolate chips
1/2 C oats
1 tsp vanilla
2-3 T almond butter
1 banana (optional, banana can help things mold. I personally didn't use one)

Add raspberries to saucepan and heat over medium. Stir until they are a liquid. Remove from heat and add remaining ingredients. Stir until chocolate is melted. Spoon mixture onto cookie sheets covered in parchment or wax paper. Place in freezer for 1-2 hours to set up. Keep covered and store in freezer. 


*you could also use carob chips if you prefer

Saturday, August 4, 2012

Whole Grain Blender Waffels (Gluten Free)


Good Morning!!!!!!! It's Saturday and there is no where else for me to go this morning except lounging around eating AMAZING food with my sweet little family! The weekends are when I usually try and make a larger breakfast, obviously because I have more time in the mornings!

A few days ago my husband told me he was craving some big, syrupy, waffles or pancakes...I think he wanted a lot of butter included in that too :) well I couldn't help him with the butter but I could help him with the big, syrupy waffles!!!! I found these tasty little things here and I only changed one ingredient since I didn't have any concentrate juice and I was out of dates! So what did I add....honey. Super simple but I think they tasted wonderful, they're gluten free so I think that's saying something!

Whenever we'd stay over at my parents house and we had pancakes or waffles my mom always had her "special" pancakes or waffles that were gluten free! We never tried them, since they were sure to be nasty (even though she just loves them) well if they taste like these gluten free waffles I think I may just battle it out over the gluten free "special" waffles with my mom :)!  These are quick and easy and ready in a matter of minutes. You throw everything all at once into your blender (you need a high powered one, I've got some links for blenders at the bottom) and a minute later you have your waffle batter! These are wonderful served with either maple syrup or my strawberry syrup that you can find here Easy Peasy!


Whole Grain Blender Waffles

2 C water
1 T honey
1 C oats
1/4 C millet or corn meal (I used corn meal)
1/4 C ground flax seed
1/4 C raw cashews
1 T cornstarch
1/2 tsp salt

Place all ingredients into blender and blend on high for one minute or until everything is very smooth and blended together.


 Pour batter into a heated waffle iron. They are done when they are very brown and slightly crispy on the outside! Serve warm with fresh or frozen fruit on top!! Enjoy!


Wednesday, August 1, 2012

Fresh Raspberry Soft Serve


Ice cream. Do I miss not indulging in creamy, sugary ice cream from Farr's or Ben and Jerry? NO! Want to know why, because I can make this baby!

It's fast and it satisfies! It's also full of completely natural ingredients. Challenge yourself to try using bananas for your soft serve instead of using cream! It really is wonderful. So do I still think dairy ice cream tastes good....you bet I do. Is it worth it to me? Nope it's not. I'd rather eat a huge bowl of this and not finish it, than give myself two small scoops of other ice cream with maybe a small amount of toppings and then leave myself wanting more, but I can't have more because then I'll kick myself for it later! No thanks, it's more fun to eat as much as I want :) I made this after the kids went to bed because I was in a selfish mood and wanted it ALL FOR MYSELF! So I snuggled in from of the computer ate my huge bowl and worked on my eBook! Talk about De-stressing....for me at least. Enjoy this, I know you will!

Raspberry Soft Serve

1/2 C frozen raspberries
1-2 frozen bananas
almond milk, just until you get the consistency you want, I used about 1/4 C.
fresh raspberries to top it with

Place bananas and raspberries in the blender. Slowly add milk while blender is going until you reach the soft serve consistency. You may have to scrape the sides of the blender! Top with fresh raspberries and enjoy. 
Sub out raspberries for any fruit or berry you want!

Sunday, July 29, 2012

Strawberry Sweet Bread w/ Strawberry Glaze


Are you ready to get your grain on? This sweet bread was marvelous, but it is full of yummy grains, and a surprise ingredient....quinoa! Yes, cooked quinoa! I have never used quinoa in a baking before. I've seen the quinoa flour and pasta, however I've never thought to use cooked quinoa.

This recipe is a combination of many searches and mashing them all together to satisfy my tastes! I found some ideas at ohsheglows.com, poorgirleatswell.com, and my best friend google!  I knew a few things I wanted, I wanted it to be egg less, healthy (obviously), I wanted a glaze and I wanted a berry or fruit. I couldn't decide between strawberries or cherries for awhile, finally I decided on the strawberries (I do think cherries would be great in this too, with a cherry glaze...maybe some chocolate chips....light bulb!!!! Cherry chocolate chip bread!!! To be continued...)

Well after I had compiled a list of ingredients I stumbled upon the idea of adding cooked quinoa to your baking, since apparently it adds moisture, more healthy grains, and flavor! Hmmmm, well the purpose of my blog is to think outside the box when feeding ourselves and our families healthy. So I decided to try it. Whenever I make up a recipe I get very unorganized in my baking, maybe I should do a post on how to simplify baking and cooking so clean up is easier...it will say..."Don't bake like ME!"


As I was starting the process of making the bread, I had those negative thoughts come into my head, just like with the veggie kabobs, I kept thinking, your taking a risk with just mashing together multiple recipes, you just finished doing a budget post and now here you are going to waste all your food!

Well I'm here to tell you when the negativity bug comes knocking, punch him! A lot of times when we have just a basic idea in mind, sometimes that is when we create our tastiest creations! I will admit I've never been awesome at glazes, they never seem to get really thick for me and they tend to absorb into baked good a lot, not that it hurts the flavor it just doesn't look as pretty. I let things cool and everything so if anyone has any tips let me know! This bread turned out really tasty! I really enjoy things where you can taste the health of it, but it still has an enjoyable sweetness to it! And this had it all for me. The glaze made some bites taste almost like a doughnut...I mean that is awesome right! It was a pretty pink color, so as soon as I saw it I thought, 'what a nice Valentine's Day Bread' and it would be, but we'll enjoy it in July as well :)  Okay enough chit chat, on to the recipe! Enjoy this, just save some for everyone at your house :)

Strawberry Sweet Bread w/ Strawberry Glaze
2 C flour (I used whole grain Spelt Flour)
1 C quinoa, cooked
2 tsp baking powder
1/2 tsp baking soda
1/4 tsp salt
1/4 tsp nutmeg
1/2 tsp cinnamon
1 T ground flax seed
2 T raw cane sugar (optional)
1/2 tsp apple cider vinegar
3/4 C almond milk (or any non-dairy milk)
1 C strawberries
1 tsp vanilla
1/4 tsp almond extract
1/4 C agave 
1/4 C raw honey (you can also use maple syrup)
1/3 C oil (I used olive oil)

Glaze
1/2 C confectioner's sugar (powdered sugar)
4 frozen strawberries


Preheat oven to 350 degrees. Cook quinoa completely. Set aside to cool. Combine almond milk, vinegar, agave, honey, almond extract, vanilla, and oil to a small bowl. Set aside while you combine the dry ingredients. Add all dry ingredients, except strawberries, and including quinoa to a large bowl. Add wet ingredients to dry ingredients and mix well until blended, add strawberries. Be careful not over mix the Spelt flour, it's a delicate flour. Pour dough into a bread pan and bake for 30-35 minutes or until completely cooked through. Remove and let cool on a cooling rack. After bread has cooled slightly, begin to assemble glaze. Add sugar to a small bowl. Make sure strawberries are thawed (I actually microwaved mine for a minute to make them mushy) Smash out as much juice as you can and pour it into the sugar, try and keep as many chunks out as possible, I ended up with about 4-5 T of liquid. And after awhile I had even more, that I didn't use, so if you want a lot, keep mushing them! Pour glaze over the top of the bread! Enjoy


*Question for everyone, I've noticed there is a debate whether or not honey is vegan. I know it's made from Bees so I guess in that sense I see how it isn't, but I would love others opinions, I'm not sure if I should call things that use honey vegan?

Saturday, July 28, 2012

"Lazy Lime" Breakfast Smoothie


It's the letter "L" today, I'm not sure if I'm going to do a letter tomorrow, I'm having a tough time finding time to do alphabet day on the weekends so it might just be a Monday-Friday deal :) Today is my "Lazy Lime breakfast smoothie! I have never really been able to take a lovely picture of a smoothie, this one is no different I'm afraid. It was much greener than the picture lets on and more appetizing to look at! I'm working on my photography skills guys :)

 I call it lazy because you really can't beat the speed and ease of a smoothie, and everyone in my family drinks one, so no need to try and make a huge breakfast for everyone! It's lazy, but oh so healthy! I had never used lime in my smoothies before, I liked the subtle hint of lime. If you want more lime taste you might want to throw some zest into yours!

The great thing about smoothies is how many nutrients you can back into them or proteins and all you really taste is a super yummy drink! I used to feel that I needed yogurt in my smoothies at all times, but now I am totally satisfied just stuffing it full of bananas, fruit, and I use almond milk a lot in my smoothies! I always add Chia seeds, and Flax seeds to my smoothies to get the calcium and omega 3's.

P.S. I may start a rumor that there may be a giveaway on here soon....just sayin' :)

Lazy Lime Smoothie
1 fresh banana
1/2 frozen banana
1/2 C frozen strawberries
1/2 C frozen blueberries
2 limes, juiced
2-3 large handfuls of spinach
1 T ground flax seed
2 T Chia seeds
Oats, for top (optional)
1/4 C water
1/4 C almond milk

Combine all ingredients, apart from oats, to blender. Blend on high until completely smooth! About 90 seconds. Add oats and fresh lime zest to the top if you'd like!!! Sleep in, be lazy, it's a weekend :)


Sunday, July 22, 2012

Tootie Fruity Freeze Cups


It was a nice hot day today, so after dinner I wanted to make a treat that would cool us down. It still is "F" day for our alphabet days and we are honoring fruit today, so what more could I do than a delicious fruit cup. I wasn't sure how they would turn out, since I just invented them today :) Well, I invented the filling, for the crust I used the berry pie crust and just put in a cupcake pan instead of a pie dish! It worked out really great, they actually popped out easily, that's the part I was most worried about do you know what else is great, they are gluten free and vegan, what do ya know! 


*I also think if you want to do a revamp of the berry pie you could put it in cups like these and have mini berry pies!!!!

 I did a banana filling, and after you pop it in the freezer for a couple hours it comes out much like a banana Popsicle in a crust...Next time I think I'm going to puree all the fruit and turn the whole thing into a fruit freeze instead of topping it with the fresh fruit, not that it wasn't good, I just want to shake it up! Go ahead and play around with it, it's quite simple to make, it just needs time to set up, make it your own! Enjoy

Tootie Fruity Freeze Cups

1 recipe of berry pie graham pie crust (link above)
1 fresh banana
1 frozen banana
1/3 C agave or raw honey
2 T fruit jam (optional)
1/3 C almond milk, or any non-dairy milk
2 T cornstarch
1/2 tsp vanilla
1/4 tsp almond extract
1/4 tsp cinnamon
cut fresh fruit

Pre heat oven to 350 degrees. Prepare pie crust according to directions. Smash crust into cupcake pan. Bake for about 8 minutes. Watch closely, these are smaller so they will burn much faster! Set aside to cool slightly. Add frozen banana and almond milk to blender and blend until broken up and blended slightly. Add fresh banana, agave, jam, vanilla, and almond extract. Blend until very smooth and no banana chunks. Add contents of blender to a small saucepan, heat over med heat, add cornstarch and cinnamon, whisking constantly, until it seems quite thick. Pour banana mixture into the crust cups and put in the freezer for about 2 hours to set up. Remove from freezer and top with any fresh fruit you'd like. I used raspberries and nectarines! If you don't like it so frozen, take it out earlier so it more of a soft banana filling! 

*Just so you are aware, the filling thaws quickly. So if you have left overs cover and store in the freezer.


French Toast Dunkers


Good Morning and Happy "F" day! I have a few fun things planned for this day, I am focusing on fruit today, since fruit is an amazing thing in this world, so beneficial and tasty! So some fun facts about fruit:


-Fruits are excellent sources of fiber and simple sugars, but remain very low in calories...so eat up
- Fruits contain provide lots of soluble dietary fiber, so it helps ward off too many fats, but also helps in digestion... and prevents getting plugged up if you know what I mean
- Fruits are full of anti-oxidants, they can help our bodies prevent diseases, cancers, and help our bodies immune systems fight against these ailments!
-Fruits with a blue or deep purple pigment, acai, blueberries, black grapes, have been known to help prevent cancer, premature aging, and also may linked to dementia/Alzheimer's prevention
-Fruits have so many vitamins and minerals that they promote cell regeneration...which turns into slower aging!!!! 
Did you know fruits did all these things? We all know they are healthy, but these are just some of the reasons why they are healthy. I think we should have more than the standard food pyramid servings! I really try and tie them into every meal, and many snacks!!!!

Okay so now onto breakfast...I decided to make French Toast Dunkers with berry puree as a dipping sauce, I thought they turned out really great, my kids loved them too. If you don't want to do the berry puree then use maple syrup! I liked these since they were super quick, and not quite as messy with my kids believe it or not, whenever I give them pancakes or waffles with syrup it always gets all over them and my chairs, counters you name it. These, however, seemed to be a much easier clean up...which I vote for.  If you'd like a vegan recipe for french toast, check out this recipe right here...it was also a huge hit!

French Toast Dunkers

3 slices whole wheat or whole grain bread
2 egg whites
1 tsp vanilla
1/2 tsp cinnamon
1/4 tsp almond extract (optional)

Slice the bread into 1/2 inch strips. Combine egg whites, cinnamon, and vanilla to small bowl and whisk until mixed very well. Lightly grease skillet with coconut oil. Heat skillet to med. heat. Dip strips of bread into egg mixture until both sides are coated. Let excess drip off. Place strips on the skillet and cook until both sides are brown, about  a minute or two on each side! Serve with berry puree dipping sauce or maple syrup, Enjoy

Berry Puree
2 c fresh berries
3 T maple syrup
1 T raw cane sugar (optional)

Place all ingredients into blender and blend until completely pureed. Serve as is. 


Saturday, July 21, 2012

Energizing Overnight Oats


Well for "E" day in the alphabet days I decided to have breakfast waiting for us in the morning, with "Energizing" overnight oats...okay okay, I'm stretching the "E" a little bit, but I was going to make an egg white omelet, but I want to save my veggies for a pasta salad I'm making for a baby shower, and we are going to be super busy around dinner, which I had planned something like eggplant parmesean or enchiladas, but those will just have to wait!

So the idea for overnight oats came from ohsheglows.com she has a lot of overnight oat recipes, but how to make this "Energizing" overnight oats and why! Well I don't know about you, but my kids wake me up super early, my husband gets home super late sometimes so he wakes me up, not on purpose, then my kids wake me up looking for breakfast...and last night and this morning I knew would be no different and since we're on the go today there is no time for any R&R, so instead of feeling weak and possibly getting a caffeinated beverage I decided to start the day out right with some natural sources of energy! So the specific things added for energy:
 Raspberries, these little babies are chuck full of natural energizers through all the vitamin C these berries contain and good carbohydrates! One cup of raspberries provides 50% of your daily vitamin C intake for only about 50 calories! It also gives you 14 g of carbohydrates! So you can feel awake from the get go!

Bananas, again bananas are an excellent source of good carbs and vitamin C but also potassium which can help regulate your blood sugars, if your like me sometimes I get spikes if I'm not eating the way I should and go into dizzy, shaky spells! Bananas provide us with 30 g of carbs in a single banana, 15 % of our vitamin C intake, and 13% of our potassium intake!

Chia seeds, chia seeds are full of the omega 3 fatty acids which provide a whole list of benefits for our bodies, but also providing energy to our muscles and organs!

Almond Milk, the almond is a great source of protein which provides the energy our bodies need! Combined with the almonds from the super bars this breakfast is full of proteins. Almonds are known at times to have more protein than some meats, but with the good fats included!

So there is a lesson on some foods that can give you the natural pick me up without turning to refined sugars and caffeine! Now onto breakfast...I need to top these with something crunchy, so I used some left over super bars from yesterday. They are really soft in the morning, so if you don't like that texture add something crunchy and it's just like cold cereal to me!

Energizing Overnight Oats
1 1/2 c of raspberries
2 c oats
2 c almond milk
2 T chia seeds
1 tsp ground flax seed
1 tsp cinnamon
1/4 tsp almond extract or vanilla
1 banana chopped, (add in the morning)
1 cup granola (add in the morning)

Combine all ingredients except banana and granola, into a dish. Mix together and put in the fridge overnight, or over 3 hours. In the morning top with banana and granola! That's it, enjoy! Add anything else you'd like, fruit, nuts, make it your own!

*Gluten Free option use gluten free oats

Thursday, July 19, 2012

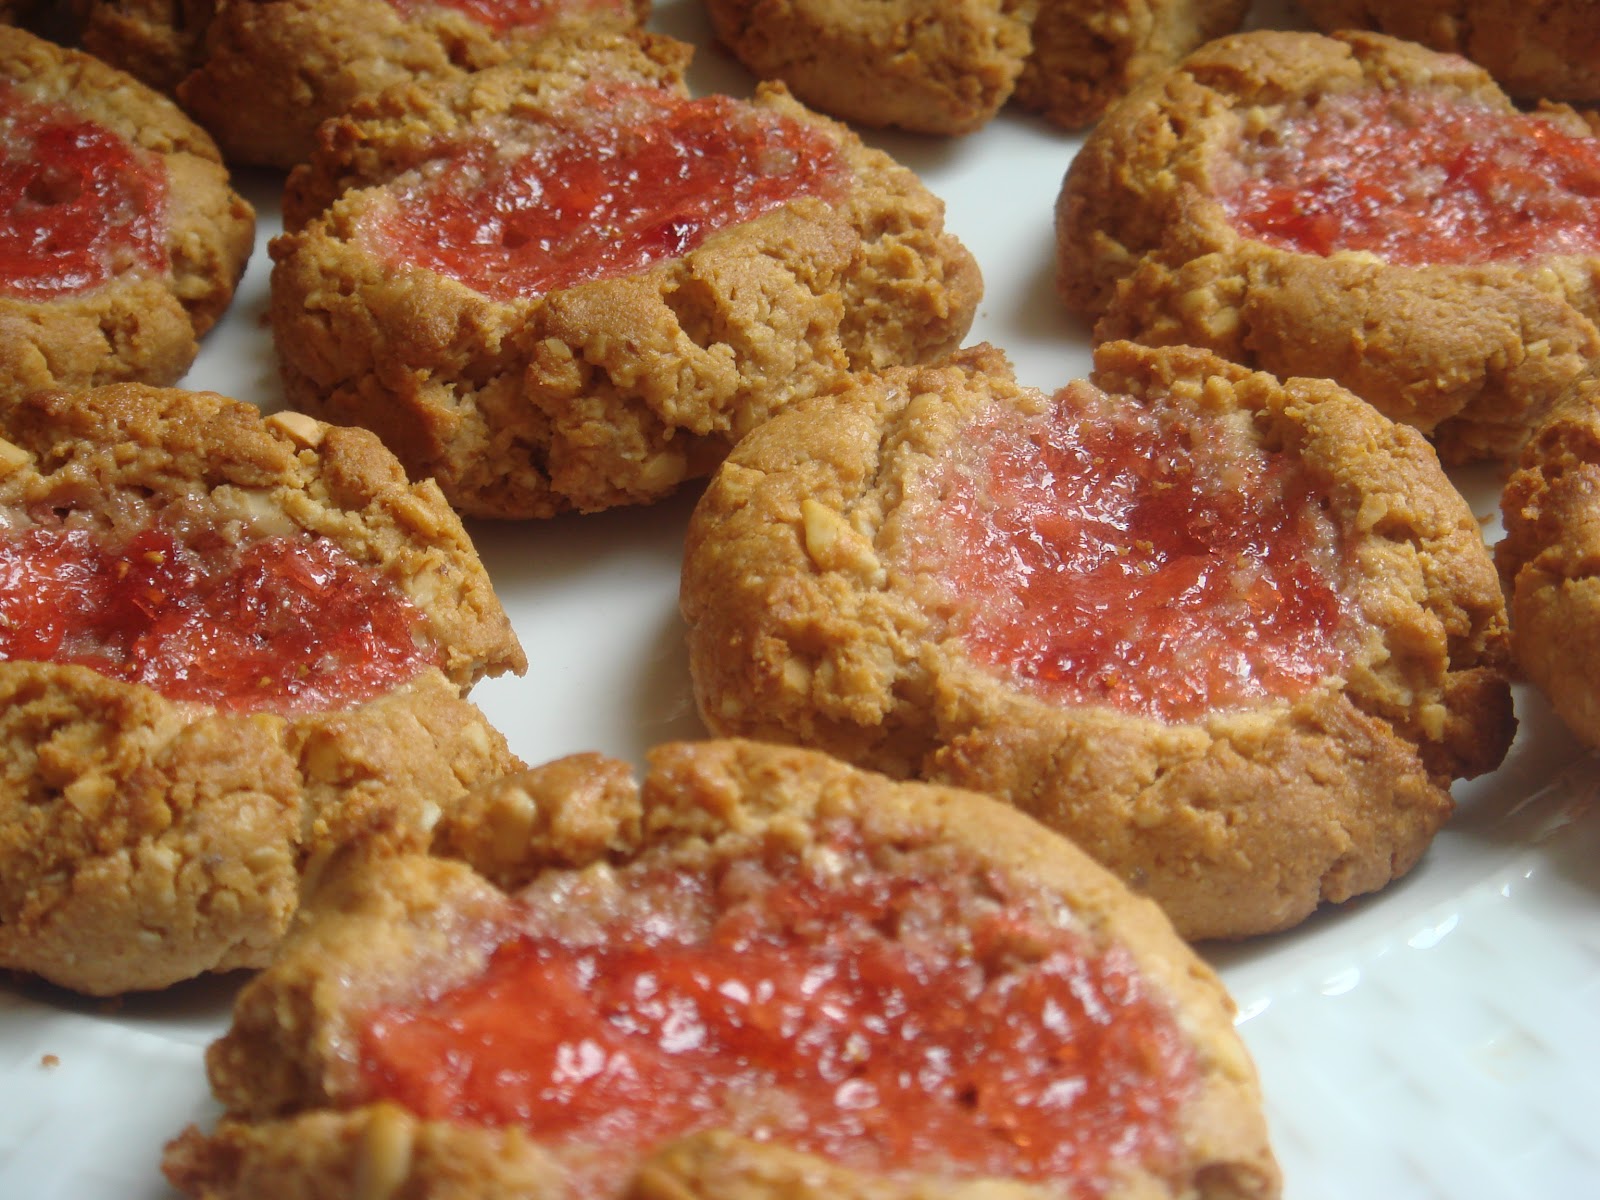
Cashew Thumb Print Cookies


If you want a healthy cookie without loosing the sweetness...here you go! I loved these! They are adapted from this recipe at ohsheglows! They were awesome and such a fun cookie for the kids to help with! I love the nuts in this recipe and the flavor they bring, combined with the fruit filling, you've got a winner in my book! This is our double "C" cookie for our Alphabet days, Cashew Cookies!

Another Bonus of these little babies, they are gluten free! How great is that! I'll admit I'm not awesome at gluten free breads and most sweets, but these don't taste any different than other cookies! I'd eat these even if I didn't enjoy eating healthy :)

Cashew Thumb Print Cookies

1 1/3 c raw cashews
1/4 C brown rice flour
2 T ground flax seed
1/4 tsp + 1/8 tsp sea salt
1 tsp baking powder
1/2 c cashew butter (or almond butter)
1/4 c maple syrup (I actually used honey and agave mixed and it worked awesome!)
1/2 tsp almond extract
1/3 c coconut (optional)
1/2 c fresh berries

Place cashews in high powered blender and blend until they are ground into a flour consistency (you can leave it slightly chunky if you want more crunch) Whisk ground up cashews with all other dry ingredients. In a separate bowl combine wet ingredients. If the cashew butter isn't soft and drips, melt wet ingredients for 20 seconds in the microwave to make them soft! Mix wet ingredients into dry ingredients.


 Roll dough into small balls and place them on a cookie sheet. Puree fresh berries or fruit in blender until it is a sauce.  With your thumb push down into ball so there is a little bowl in the cookie.


 Fill bowls with fruit sauce.  Place in the oven and bake at 350 degrees for about 10-12 minutes! Watch closely! Let them cool in the fridge for 15 minutes! Enjoy


*If you don't want to use fresh berries, by all means use already made jam! It tastes great no matter way! Or you could put some chocolate chips in the bowls and melt them during baking so you have a chocolate cookie!


Sunday, July 15, 2012

Overnight Buckwheat Parfait!


I had a jar of buckwheat that I had sprouted and I wanted to use! I found this recipe at my favorite vegan website for a buckwheat parfait! It sounded perfect! It almost has no prep time! It would be a super healthy breakfast and really easy! Buckwheat is full of nutrients, it has been linked to helping with varicose veins, lowering cholesterol and it is full of amino acids! Who wouldn't want to tie these little babies into something! The parfait turned out really great! I loved it and you can add so many different things to make it taste exactly how you'd like it to! We all kind of made it our own at our house. My little girl wanted just a few chocolate chips and my husband added  some crumbled up butter bean scotchie cookies! On my parfait I sprinkled some cinnamon! It was really tasty! Just be aware to use sprouted buckwheat you can find some instructions on how to do that here, it does take a few days! But the powerhouse of nutrients it brings is worth it! You can find the original parfait recipe here

Overnight Buckwheat Parfait
1/2 c sprouted buckwheat
1 c almond milk
2 T chia seeds (these thicken it up)
1 banana
1/4 tsp cinnamon
1/2 tsp vanilla

Place buckwheat in small container and cover with water. Place it in the fridge overnight. Combine remaining ingredients, be sure to mash the banana really well. Whisk until there are no lumps, put in a bowl, there is no need to cover  it if you don't want and put it in the fridge over night. 

In the morning rinse and strain buckwheat until any starchy residue is off. Add buckwheat to the banana chia seed mixture and completely combine. Place in glass, with any toppings desired! Finish by topping with maple syrup or cinnamon!


Possible Toppings
Kiwi
Strawberries
Raspberries
Banana
Granola
Oats
Chocolate Chips
Mango
Blueberries
Blackberries
Nuts, seeds
Cinnamon
Coconut Sugar
Coconut Flakes
Nut butter
Protein Powder
Chocolate sauce
Crumbled muffins/breads
The sky is the limit

Saturday, July 14, 2012

Berry Pie with Graham Cracker Crust


I have always loved berry pies! For my birthday I don't want birthday cake or ice cream it's always been berry pies, like strawberry rhubarb or razzleberry, you name it I love it! I saw this recipe for an ice box berry pie while I was flipping through a magazine. The magazine was a low fat cooking magazine, but this crust still used quite a bit of butter with the graham crackers...so I wanted to make the crust better, but not use so much butter! I am really happy with how it turned out, it has a nutty taste to with the graham cracker crust, and of course the filling is just what I like, tart, sweet and full of all the berry pie goodness I love! This takes some time and attention, but it was worth it!

Graham Cracker Crust
1/2 c raw cashews
8 full graham crackers
1 tsp baking powder
1/2 c almond or cashew butter
6 T agave nectar
1/2 tsp almond extract

Filling (use fresh berries, not frozen)
2 c raspberries
2 c blackberries
2 c blueberries
1/3 cup raw cane sugar
3 T cornstarch
1/8 tsp salt
1 T fresh lemon juice
2 T fruit jelly (I used strawberry, but I think any type would work)


For the crust preheat oven to 325. Add graham crackers and cashews to food processor or blender. Process for about 30 seconds until both are fine like a flour. Put mixture into medium bowl and add salt and baking powder. Combine agave nectar, nut butter, and almond extract in microwavable bowl. Melt in microwave for about 15-20 seconds and combine with graham cracker mixture. Press crust into bottom of pie dish, poke holes with fork all over, bake for 10-12 minutes. Set aside and cool completely, about 30 minutes, (p.s. I'm the most impatient person, so I ended up putting it in the freezer for about 5-10 minutes to speed things up :)
For the filling toss berries together into small bowl, take 2 1/2 cups of berries and add it to the blender. Blend until berries are a puree about 1 minute. You should end up with a little over a cup, if you have more that's okay it just means more filling right! Whisk sugar, cornstarch, and salt together, then whisk into the berry puree. Heat puree on the stove top to a boil, stirring constantly, and cook until it is thick like a pudding, (get those muscles working) about 5-7 minutes. Off the heat add lemon juice and set aside until just warm. Pour berry puree onto cooled pie crust. Melt jelly in a small bowl in the microwave about 20-30 sec. and pour over remaining whole berries, gently toss to coat. Spread berries evenly over crust and puree! Cover loosely and let chill in the fridge for about 3 hours until filling has set up! 

*For a gluten free option, use gluten free graham crackers


*Here is a little update, or confession of love:)...this pie has now been eaten all gone (mostly by me) I just wanted to add this is my new birthday pie!!! I love it, I told my husband he needs to learn the recipe because come birthday time this is it!!!!

Tuesday, July 10, 2012

Berry Healthy Soft Serve!


It's HOT! It's July and I boil just about every day! So what do you want when it's hot....cold! I want a shake, Popsicle, really anything to cool me down! Well today I felt like making some soft serve for my little ones. I've really tried to avoid dairy with my kids. They eat some cheese now and then, but typically I try and keep them off it. My kids have red bumpy skin on their faces and arms when they have too much dairy and they always get colds, so to avoid the dairy issue, but still give them some creamy ice cream we made some soft serve in the blender. If you want a five minute, cold treat this is for you! Its full of nutritious ingredients and it is so nice on those hot days! We made two different kinds, blueberry, and strawberry...both were great! I'm going to do the blueberry recipe, but just add whatever fruit you'd like in it's place if you don't want blueberries. 


Berry Healthy Soft Serve
2 frozen bananas
1/2 c frozen blueberries
1/3 c non-dairy milk
1 tsp cane sugar (optional)

Place all ingredients in a high powered blender on high. Blend until smooth like soft serve ice cream! Serve immediately! Now go out on your porch and enjoy the summer!

*you may have to scrape the sides a few times during the blending process depending on what type of blender you have!  


Saturday, July 7, 2012

Breakfast Quinoa Fruit Salad


Mornings are a wonderful time! I love summer mornings in particular. You wake up and it's nice and cool, but it's light outside! It's perfect for strapping on those running shoes and heading out!
Winter and fall mornings can be just as nice to me! How great is it to curl up with a steamy mug of hot chocolate and be surrounded by holiday cheer everywhere you go!
It's too bad that most of the time mornings seem to be our busiest times. I know I've missed out on a lot of precious "me" time just to squeeze in a few more minutes of sleep, or I've missed the quiet moments when the sun is coming up because I didn't stop to appreciate the beauty of mornings!

So to dress up our morning today I decided to make an out of the box breakfast! Sometimes when I'm wanting some kind of grain or oat for breakfast I get bored with just oatmeal...(I do try to dress it up) but still you want a change sometimes! So I found some ideas from multiple sources to use quinoa with berries! Well I thought that sounded like a yummy wake up to my day! So I gathered up some fruit and mixed some chilled Quinoa, cinnamon and almond extract with it and what do you know it turned out to be an awesome breakfast! I really wanted to put mango in mine, but when I cut into it it was all bruised, but I'm still putting in my ingredients because I think it would be AWESOME! I think this could be used just as a fruit salad side also or lunch, but I like it for breakfast :)

Breakfast Quinoa Fruit Salad

1/3 c Quinoa
2/3 c water
1 tsp cinnamon (you can put cinnamon and sugar together for more sweetness)
1 chopped apple
1/2 banana
4 chopped strawberries
1 chopped mango
dash of almond extract

Put quinoa and water and bring to a boil. Lower heat and cook quinoa until water is gone and quinoa is tender and cooked. Add cinnamon, or cinnamon and sugar and almond extract. Chill quinoa. Meanwhile, chop fruit and place in a medium bowl. When Quinoa is chilled add to fruit and mix. Top with cinnamon and dash of sugar! Enjoy


Wednesday, July 4, 2012

Fourth of July Fun!


The fourth of July fun has come to a close for us at our house! The kids are tired, we're tired, but it has been a great day. We enjoyed a BBQ at my sister's house. The hubs and I both had things in mind that we were set on bringing. I set my goal to make great tasting healthy sides...he set his goal to make great tasting....uh well let's just say his side had quite a few more calories (dutch oven bacon cheddar potatoes...no need to say more :) But it was a great day even with a few splurges in there. Everyone gobbled up the food, healthy sides included! 
This holiday has given me a challenge for the rest of the year! I'm going to work hard on each holiday to make AWESOME tasting goodies, salads, brownies, whatever I'm asked to do, but make them guiltless...that's what I'm going to call them. I've had great luck so far just showing up with a dessert, or salad, or side and just watching people go to town. I've already thought ahead to Christmas to some things I'm going to make...hint mint, chocolate, raspberry etc...just some of the ingredients I'm thinking! It's going to be fun. I hope this personal challenge proves successful and I'm looking forward to the update posts over the next few months....but now back to the fourth of July

As I posted earlier we started the day with the yummy Strawberry Banana Pancakes (which are now gone, my kids wanted them for a snack)

For the BBQ I brought the Seasoned Roasted Vegetables, which were a huge hit with everyone...yes I will say they did complement the heart attack potatoes my husband made :)


And I also brought my Berry "Freedom" Salad and had a raspberry salad dressing! My sister and brother- in- law grilled some chicken! It was great! 


Then we finished off the day with some family water fun! The kids were hilarious with the squirt guns. We did the fireworks super early since the kids were just pooped by the end of the day, so not really great firework pictures! I have such a wonderful family and I'm so glad we all had a day off from our busy working lives to slow down and just chill with everyone!!!!
Happy Fourth of July everyone!!! Heck even if you don't live in the U.S. Happy Fourth!


Strawberry Banana Pancakes w/berry syrup


Happy 4th of July everyone! I love this holiday, it's always full of family, parades, and food! Well I plan to bring some health to my festivities today, but without losing any taste! The first meal...breakfast! What better fourth of July breakfast is there than pancakes! I got the base for my recipe from this link These are going to be strawberry banana pancakes any other day, but just for the holiday I added some blueberries, they were good in the mix, but I think I'll just keep them classic strawberry banana pancakes! They turned out great we all had at least three and my made up syrup was awesome on top too! Even my husband who is strictly maple syrup didn't have any maple just the strawberry sauce!!! So here is the first of my fourth of July deliciousness! They were super easy and I'm happy to say they worked very well, just like boxed pancake mix (I had a disaster last time I attempted homemade pancake, this result was much nicer!)

Festive Strawberry Banana Pancakes

1 1/4 c whole wheat flour (I mixed Spelt and Wheat)
1/2 c shredded coconut
1 tsp baking powder
1/4 tsp baking soda
1/4 tsp nutmeg
1/2 tsp cinnamon
pinch of salt
5 cut strawberries
1 banana
3/4 c almond milk (or any non-dairy milk)
1/2 tsp vanilla
1 T maple syrup
3/4 c warm water

Mash together strawberries and banana in small bowl and set aside. Whisk together all dry ingredients in medium bowl. Combine wet ingredients into small bowl and whisk together. Add banana/strawberry mixture to wet ingredients and mix together. Add wet ingredients with dry ingredients. Mix until all lumps are gone. Heat skillet over med heat. Drop pancake mix onto skillet and wait for bubbles to form before flipping. Heat pancakes until golden brown on each side. Makes about 10 small pancakes. Enjoy!


Strawberry Banana Syrup

5 strawberries
1/2-1 banana (depending on if you want it creamier)
1/3 c maple syrup
1/8 c raw honey
1/4 c almond milk
handful of shredded coconut (optional)

Combine all ingredients in high powered blender. Blend until desired consistency is achieved. It will be runny. If you'd like it not quite as runny add more syrup, or you can use 1/4 c of corn syrup.